
codabear
5 Places Music is Hiding in Your Home

5 PLACES MUSIC IS HIDING IN YOUR HOME
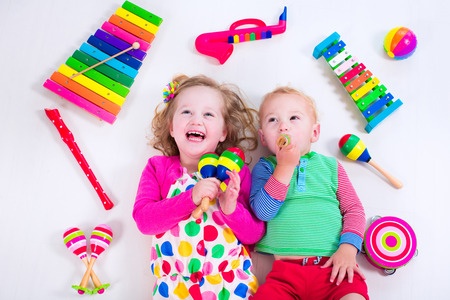
Babies and small children love to make music, and they’ll especially love to make music with you. Sure, your child’s toy room might be filled with plastic noisemakers and squeaky stuffed animals, but it’s especially fun for your curious youngster to discover “hidden” music throughout the house.Here are five instruments you already own!
FOR THE LITTLEST ONES:
Pots and Pans. How long has it been since you banged pots and pans together? I get a little impish smile just thinking about it. It’s not the kind of sound I’d like to hear every day, but what fun to stretch the rules for an afternoon and just make a lot of noise! You can use different spoons or utensils for variety—give your child a wooden spoon, a plastic spoon, and a metal spoon and watch her explore the different sound each one makes. You can also play “Marching Band”—show her a YouTube video of a band member playing the cymbals, and design your own march with a couple of lids and just a few special steps.
Noodle Sand Blocks. Nancy Stewart of Nancy’s Music offers this great idea: Use inexpensive foam swimming noodles to make a version of a sand block. Use a utility knife to cut each noodle into 4-inch pieces, and then cut each piece in half lengthwise. You end up with a pair of foam pieces that make a fun sound as you rub them together. Nancy says, “They are washable, inexpensive, colorful and musical! What more could you want? I use them with train songs and any song that has wheels, as you can rub them around in circles. When playing train songs, you can make a train and walk around the room while playing.”
FOR CHILDREN 3 OR OLDER, WITH YOUR HELP:
Rubber Band Guitar. Wrap rubber bands around an old Kleenex box so that they are drawn across the opening in the box. The bands are fun to strum and pluck! You can also attach dowels or cardboard cylinders from paper towel rolls to give your child a little handle.
Wax Paper Kazoo. Using the cardboard cylinder from a toilet paper roll, stretch a square of wax paper across the opening and use a rubber band to secure it (the paper needs to stretch tight). Poke a small hole in the center of the wax paper that is stretched across the opening. It’s such a silly delight for kids to practice making the kazoos work—you blow into them a little like a trumpet. Annie Brunson has a YouTube tutorial for these!
Paper Plate Tambourines. This is a craft project! You can make these tambourines yourself, or it can be great fun for a little one who has learned how to tie knots. Glue two paper plates together, facing each other. Once dry, punch holes around the edges. Using a piece of yarn or string, attach a noisemaker to each hole. Noisemakers could be jingle bells, macaroni, or buttons. When you’ve tied noisemakers all around the edge of the paper plates, you’ve got a really fun instrument to shake.
Helping your child to discover these hidden instruments has more value than a little noisemaking. It helps her to develop motor skills, it helps her to recognize rhythm and pattern, and it helps her to experience how vibration is associated with sound. What’s more, these explorations help her to build a sense of wonder and possibility as she sees ordinary mundane objects transformed into music.
PHOTO CREDIT
User: Didriks
Title: Fletchers Mill
License: CC BY 2.0
Nature Walks—Waking Your Child’s Senses

NATURE WALKS—WAKING YOUR CHILD’S SENSES

Any walk can be a nature walk! For us grownups, walking might be about getting someplace– but the little ones still see a walk as a journey. That journey is full of new sights and sounds; with help from you, your child can practice using and honing her senses. She’ll pay attention to all that is around her and learn about the world as she walks.
A NATURE WALK IN THE WOODS
What to Listen For. As you walk, encourage your child to identify sounds. Here are some things to listen for:
- ANIMALS: Birds, squirrels, lizards, snakes, insects, rabbits
- UNDER YOUR FEET: The crunch of leaves, the rustle of pine needles, the soft sounds of moss, the grating sounds of rocks, the stomping sound your boots make on dirt.
- IN THE AIR: Listen for wind, running water, rain. Listen to how the air sounds different when you are crouched down in a hollow versus when you’re on a promontory with a view.
What to Smell. Stop to sniff along the way. Ask your child to close her eyes and put words to what she smells.
- GREEN THINGS: Flowers, grasses, leaves, ferns
- BROWN THINGS: Earth, bark, sand, stones
What to See. Watch for the hidden signs of life in the forest, and watch for natural processes.
- LIVING THINGS: Watch for spider webs, rodent holes, birds’ nests, beaver dams, or paw prints.
- WEATHER: Watch for clouds, wind, the color of the sky, signs of recent rain, or the angle of the sun.
- WATER: Watch how water flows downhill, and watch how it puddles and pools. Look for signs of recent washouts or cracked earth.
A NATURE WALK IN TOWN
What to Listen For. There are interesting sounds in the city, too! Here are some things to listen for:
- ANIMALS: Birds, squirrels, insects, dogs and cats
- ON THE ROAD: Listen to how different cars sound and see if you can guess which cars are biggest. Listen for bicycles, scooters and skateboards.
- IN THE AIR: Listen for wind, running water, rain. Listen to sounds coming out of a shop and see if you can guess what kind of shop it is.
What to Smell. Close your eyes as you smell and talk about what you are sensing!
- GREEN THINGS: Many neighborhoods feature landscaping that smells lovely. Search out the flowers that smell the nicest and see if you can put names to them using a guide.
- CITY THINGS: Smells wafting from different restaurants can be enticing. Stop inside a bakery or coffee shop just to take a whiff.
What to See. Watch for the hidden signs of life, and watch for natural processes—but keep an eye out for people, too! They are always doing something interesting.
- LIVING THINGS: Watch for spider webs, rodent holes, birds’ nests, and tracks through parks
- WEATHER: Watch for clouds, wind, the color of the sky, signs of recent rain, the angle of the sun and shadows
- PEOPLE: Watch for people doing different kinds of jobs—window washers, mail carriers, bus drivers, waiters, coaches, landscapers, taxi drivers, and painters. What uniforms do they wear? What do they carry? What do they use? How do things look different when they are done?
PHOTO CREDIT
User: Tom Woodward
Title: Through the Woods
License: CC BY-SA 2.0
How to Make Homemade Play Dough

HOW TO MAKE HOMEMADE PLAY DOUGH

Play dough is such a blast for kids. Older kids have fun working with the dough to make crafts, and kids as young as 2 will enjoy pinching and molding the dough with close supervision.
There are tons of recipes for homemade play dough; most contain flour, water, oil, and salt. Here are a few of our favorites:
- Classic Play Dough.
This recipe must be cooked, but can still be ready in fifteen minutes. Recipes that involve cooking tend to make play dough that is more elastic and closer in texture to the store-bought kind.
- No-Cook Play Dough.
Here’s a recipe for no-cook play dough that is fun to make with kids. Since there’s no heat involved, older children can make the dough themselves—which is half the fun!
- Edible Play Dough.
Here’s a recipe for peanut butter play dough that’s edible (so long as there are no allergies).
- Scented Play Dough.
Some parents love the scent of storebought play dough; others can’t stand it. If you fall into the second camp, here’s a recipe for you. Use a drop of essential oil to give each batch of dough a different subtle fragrance. It’s a great way to help kids use their senses!
- Glow-in-the-Dark Play dough. What fun, especially around Halloween!
This recipe uses glow-in-the-dark paint for a spooky effect.
What to do with the dough—Little Ones. Children will use the dough differently, depending on their age. Very little tots will want to manipulate the dough; just learning how it works will be fun. They’ll enjoy instruction from you in how to pull off little pieces of dough, roll the dough into little balls, and press or pinch the dough flat. Work with them on shape and color recognition.
What to do with the dough—Older Ones. As children grow older, they’ll become more interested in their own projects and they’ll need less guidance. They’ll still enjoy instruction now and then—you can teach them to make elaborately decorated butterflies, for instance, or a model of the earth’s core. But they’ll also surprise you with what they come up with on their own.
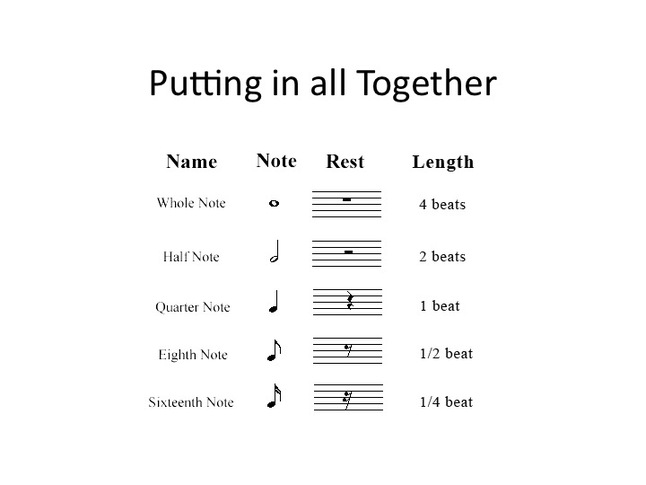
Music Education and Play Dough. At Coda Bear, we love to incorporate music education into lots of fun crafts and activities. One suggestion is to explore creating different musical notes with play dough, such as a half note, quarter note and a pair of eighth notes.
Supervision. Even homemade play dough is dangerous if ingested; most recipes contain large amounts of salt. Until your child reaches an age when you can be certain that he or she will follow instructions not to eat the dough, you should not let your child use play dough without adult supervision. It’s just too tempting to try a taste—and the salty dough does taste a little like food.
PHOTO CREDIT
User: eyeliam
Title: _1014815
License: CC BY 2.0
Musical Instruments For Children

MUSICAL INSTRUMENTS FOR CHILDREN
What instrument should my child play? Choosing the right instrument is a critical first step in your child’s music education. If your son chooses the wrong instrument, the experience of learning to play will be much less enjoyable—both for him and for you! How can you help him get it right?
- Be a Musical Family. Learning and practicing is hard; if your child is interested in music and wants to learn to play, it will be much easier for her to stick with it. Play music for your child as she sleeps. Sing songs with your child and dance. Codabear kits include songs and movement activities that offer a great start, but feel free to choreograph your own family dances to your child’s favorite tunes. If your child grows up in a musical world, she’ll be more likely to want to play along!
- Help Your Child Imagine Playing. There’s a world of difference between dancing in the kitchen and practicing a tricky ensemble piece. You can help your son or daughter to develop the motivation to learn and practice by introducing a world of musicians. Take your children to performances—whether to the symphony or to the local school concert. Point out the different instruments and ask your child to imagine being a part of the band or orchestra. Ask him what his favorites are.
- Learn the Sounds that Instruments Make. Listen to classical music and help your son or daughter to identify the parts that are played by each instrument. A string quartet or a jazz band includes few enough musicians to distinguish the individual parts. Peter and the Wolf is another great resource: designed specifically to introduce children to music, each character is represented by a different instrument or set of instruments.
- Consider Your Child’s Physical Abilities. Smaller instruments—such as clarinets, violins, and flutes—are easier to tote and carry. However, if your child has a large frame, it might be rewarding to explore the cello, trombone, or saxophone. Long fingers help with piano-playing, and dexterity is important for the oboe. Large lips and straight front teeth are helpful for brass instruments such as the trumpet and tuba; if your child does not yet have adult front teeth, be prepared for some challenges as she learns a wind or brass instrument.
- Consider Your Child’s Temperament. Some children may have personalities or intellectual abilities that will make it easier to learn certain instruments. Here are a few questions to ask yourself:
- Is my child careful and responsible? Musical instruments are expensive. If your child is unlikely to take good care of his or her instrument, it might be important to start with a less expensive instrument, such as the recorder, flute, or clarinet.
- Is my child intelligent and analytical? Some instruments—such as the oboe—are very difficult and require strong intellectual abilities. Analytical inclinations may help your child succeed at the piano, which requires an ability to break down parts of the melody and harmony.
- Is my child an extrovert? If so, he or she might prefer to play an instrument that is often featured in a solo. A flute, trumpet, violin or saxophone might be a good choice. Introverted children might prefer a clarinet or cello.
- Give Small Children a Foundation in Music. Small children often start with the violin or piano. These instruments can be played by very small people, and offer an early education in musical principles that can be translated to other instruments later in life. Those who start on the violin might progress to a viola, cello, guitar, or bass. Those who start on a clarinet might move to larger woodwinds, such as the larger clarinets or saxophones or the bassoon. A small child might start on a cornet and progress to trumpet, trombone, tuba, or French horn.
- Think Outside the Box. Many children love playing in the percussion section, and vocal lessons can offer all the benefits of a musical education without the investment in the hardware. If your child is 8 or older, give him or her the opportunity to consider less common instruments that might be in high demand, such as the piccolo, viola, baritone, or bassoon.
- Give Your Child Choices. The jury is still out as to whether it is important to force a child to learn an instrument. Musical education comes with a host of benefits, but when children feel forced to learn instruments they sometimes miss out on the pleasure that is supposed to accompany musical education. Once you’ve considered the tips above, pick out a few instruments for your child to choose from, and talk about the special things that distinguish them. Then let her follow her heart.
Memory Games for Preschool

MEMORY GAMES FOR PRESCHOOL

Imagine something you did often as a child but don’t do anymore. Riding a bike, for instance, or playing basketball. At the time when you did this often, you were fluent. You could hop on a bike in a flash and get flying down the road in no time.
Now imagine that you’re joining your childhood self on that ride. You see a bike on the lawn and you pick it up—but you’ve had a long hiatus. You might find it awkward to get on the seat. You have to adjust your body to the seats and the pedals. You have to remember whether you brake by pedaling backwards or by squeezing the gears. In a few blocks, you’re shaky but you’re moving. After a few more blocks, you’ve got the hang of it—but your childhood self is way up ahead.
This exercise illustrates how much easier it is for your child to move ahead in school when she has mastered a concept to the point of knowledge,—and how hard it is for a child to keep up when she is still at the stage of recall.
You can help your child assimilate knowledge the same way that you learned to ride a bike: by practicing. Here, Codabear gives variations on memory games that you can play with your preschooler, and offers tips for using these games to memorize concepts and information in school.
The Memory Pairs Game. You might have played the memory pairs game when you were young. You start with a set of cards, each of which has one pair in the deck. You lay all of the cards upside down, and you take turns so that each player turns over two cards. If the two cards that the player turns over are a pair, then he gets to keep the pair. But if the two cards aren’t paired, then the cards are turned back to face down and it is the next player’s turn. As the game continues, players remember the location of the cards that were previously turned up—and they can remember where to locate pairs. After all the cards have been paired, the player with the most pairs at the end of the game wins.
A DIY Memory Pairs Game. The classic game is fun and nostalgic, but you can create your own memory pairs game at home. Take two sheets of paper and cut them each into eight identical pieces—so that you get 16 “cards”. Draw eight items on the front of eight pieces of paper, and then draw the same eight items on the other eight pieces of paper. You can decide what items to include—they might be animals, numbers, letters, cartoon characters—have fun with it!
Shuffle the sixteen pieces of paper and place them face down on the floor. You’ve made your own memory pairs game!
Variations on the Memory Pairs Game. There are lots of different ways to play this game. Here are a few Codabear favorites:
- Take it outside. One fun variation is to make an outdoor game—use large pieces of paper or posterboard for the cards, and have the kids run around the yard to find their pairs.
- Use cups or containers to hide pairs. You can make the activity kinaesthetic: instead of drawing on paper, you can hide paired objects. For example, you could hide pairs of buttons under a set of sixteen plastic cups.
- Use pairs that aren’t identical. Instead of matching dogs with dogs, you can up the ante by using categories. For example, you could pair an activity with something you might wear to participate in that activity. “Cooking” could be paired with “Apron” and “Running” could be paired with “Tennis shoes.” Or you could pair an object with the place where you might find it—a seashell might be found at the beach, and a swing might be found at the park.
Using the Memory Pairs Game with School-Age Children. Research suggests that memory games alone do not improve memory. However, the practice of repeating rituals or processes may help you to memorize faster. This is the reason to play memory games with a preschooler: if she is familiar with the form of the game, she may be able to use that game to memorize new information more quickly.
For example, think of something that a school-age child might have to memorize: such as the multiplication table. You can use a memory pairs game to help your child master these tables. Take two sets of eight cards. On the first set, write eight multiplication problems (such as 2×2). On the other eight cards, write the answers (such as 4). Shuffle the cards, flip them over, and ask your second-grader to match the problem with the solution.
Doesn’t that sound more fun than reciting the times tables in the car?